
Side Recipes

Potato Side Dumplings

4 servings (two medium loaves, about 16 slices)
NEW

Most people are familiar with a side of bread dumplings, but there are a few other kinds of dumplings that, apart from their name and their purpose as a side to main courses, do not have much in common and taste very different. This potato dumpling tastes very earthy, and its tex Read More

☆☆☆☆☆0x(write a review)👁22x
Published: 11.17.2026
Side Recipes
NEW
Vegetarian
45 min.
90 min.
2/5
468 calories Per Serving (of 4) Read More

Before You Start

Let’s talk about important parts of the recipe before you start…

Jump to Recipe

The Dumplings That Belong Beside the Sauce

Potato Side Dumplings are one of those side dishes I keep coming back to, because they do a job nothing else does quite as well: they soak up sauce. The dough is simple — potatoes cooked in their skins, shredded, then worked together with all-purpose flour, melted butter, salt and two eggs. You shape it into loaves, boil them, brush them with oil and slice them about three quarters of an inch thick.

Nothing here is complicated, but a few points decide whether you get tender, sliceable dumplings or heavy ones. Let me walk you through what matters before you start, so the first batch comes out the way you want it.

Choose Potatoes with Yellow Flesh

It is best to use any kind of potato with yellow flesh for Potato Side Dumplings. Ideally, reach for Yukon Gold potatoes, Dutch Yellow potatoes, or any other variety called gold or yellow — that is where the nice yellow color of the finished dumplings comes from. The bottom line, though, is that this recipe will work with any kind of potato, even Russets: the texture will be great, but the color will not be that traditional yellow. If you want to push the color further, you can add up to 1 teaspoon of a not-so-Czech ingredient, turmeric. You need 1 ½ pounds of potatoes, rinsed thoroughly under cold water first to remove any surface dirt.

Cook the Potatoes with the Peel On, Then Let Them Cool

The potatoes go into the pot whole and unpeeled, fully immersed in water, and onto a high-heat burner. Once the water boils, reduce the heat to medium and cook until they are fully done. The time depends entirely on the kind and size of the potatoes — anywhere between 20 and 60 minutes. Test with a fork in the center: if it goes in smoothly and without any resistance, just as it would with side potatoes, they are cooked. If you are unsure, give them a little longer; slightly overcooked potatoes will still do the job well here. Then drain them and let them cool fully on the countertop before peeling. You can speed that up by immersing them in cold water. Only after they are cooled do you peel them by hand, using a paring knife for any stubborn parts.

Shred, Don't Mash — and Get Rid of the Big Pieces

Use a box grater on the side with the larger holes and shred the peeled potatoes straight into a large mixing bowl. A kitchen mixer with a grater attachment or a food processor will do the same work. Any pieces that cannot be shredded — too small, or falling apart in your hand — simply smash with your hand and add to the bowl. This matters more than people expect: it is best to eliminate large potato pieces, because they make it harder for the dough to hold together. A uniform, finely shredded potato base is what lets the flour and eggs bind everything into something you can shape and slice.

About the Flour — and Why I Skip Wondra

In the Czech Republic we use hrubá mouka, which translates as coarse flour, and it is simply not available in the US. My recipe works well with plain all-purpose flour — 1 ¾ cups, adjusted if needed. You will see some US recipes asking you to substitute about a third of the total flour with Wondra flour. In my opinion that is totally unnecessary, since it is not a substitute for coarse flour anyway. Keep a little extra all-purpose flour within reach instead, because the moisture of your potatoes decides whether the dough needs a touch more.

Melt the Butter Gently

Three tablespoons of melted butter go into the dough. Cut the butter into small pieces before melting it — that alone makes the melting more even. If you are using a microwave, melt it in a measuring pitcher or a small glass or ceramic mixing bowl, in short bursts with a few seconds' break in between, which prevents those little butter explosions that coat the inside of your microwave. If you prefer the stovetop, melt it over low heat with occasional stirring. Either way, you want it liquid and ready before you start combining the dough.

Knead Only as Much as You Must

Add the flour, the melted butter, ¼ teaspoon of salt and 2 large eggs to the shredded potatoes, and knead with your hands into a compact dough — just enough to combine it nicely. This is the step people rush past in the wrong direction: do not knead longer than necessary, or you will end up with mushy dumplings. The dough can be slightly sticky but should not be too sticky. The test I use is simple — it can cling a little to your fingers, but you should be able to move the whole mass around with your hands without a problem. If it sticks too much, work in more flour and knead again by hand, adding the extra flour gradually, part by part, rather than all at once.

Shape the Loaves to Fit Your Pot

Turn the dough out onto a lightly floured surface and form it into two medium loaves about 2 to 3 inches in diameter. This is where your equipment decides the shape of the recipe: if your pot is smaller, split the dough into more than two loaves. I use a large brazier pot or a large sauce pot of at least 8 quarts, preferably 12. Fill it to about half its capacity with water, cover it with a lid and bring it to a boil on high heat — you can use the same pot the potatoes cooked in. Based on the size of your pot you may have to work in batches, and the dumplings need room to grow, because they expand slightly as they cook.

How to Tell the Dumplings Are Done

Make sure the water is actually boiling, then carefully slip the loaves in. After about 1 to 2 minutes, gently move them so they do not stick to the bottom — that is a small movement that saves the whole batch. Cook for about 20 to 25 minutes, turning them after the first 10 minutes. The tops can look slightly slimy, which is normal, and the real check is temperature: the internal temperature at the thickest point needs to be at least 165°F. A food thermometer takes the guessing out of it. Lift them out carefully with a large skimmer or two regular turners.

Brush, Rest, and Slice

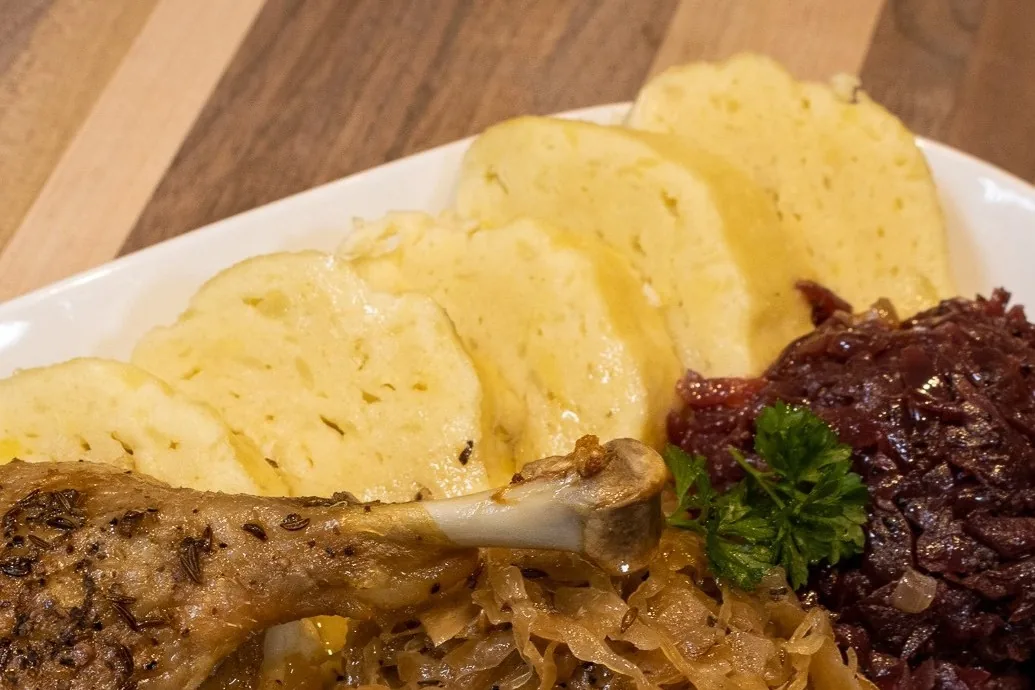
As soon as the dumplings come out of the water, brush each one on top with vegetable oil — about 1 tablespoon, adjusted as needed — using a silicone brush. That thin film keeps the surface from drying out while they rest. Let them cool slightly before slicing, about 5 to 10 minutes, then cut them into slices roughly ¾ inch thick. Serve the Potato Side Dumplings warm with goulash, with duck and sauerkraut, or alongside any of your favorite meals that come with a sauce worth catching.

Reheating the Next Day

These are good the following day as well. Reheat the dumplings in the microwave at the time of serving, covered with a microwavable lid, or use any steam pot. Either way they come back quickly, warm and steamy, which is exactly how you want them on the plate. Reheat them just before serving rather than well ahead, so they keep that soft, freshly steamed texture.

Popular questions

What type of potatoes should I use for the best color?

You should use potatoes with yellow flesh, such as Yukon Gold or Dutch Yellow potatoes, to get a nice yellow color on your final product.

Potato Side Dumplings

4 servings (two medium loaves, about 16 slices)NEWPublished: 11.17.2026 ☆☆☆☆☆0x(write a review)👁22x
45 min.
90 min.
2/5
🖨Print

Ingredients:

Click any ingredient to learn more
1 ½ LB of potatoes*
1 ¾ cups of all-purpose flour** – adjust if needed
¼ TSP of salt
For Brushing
1 TBSP of vegetable oil – adjust if needed
* It is best to use any kind of potato with yellow flesh. Ideally, use Yukon Gold potatoes, Dutch Yellow potatoes, or any other kind called gold or yellow to get a nice yellow color on your final product. The bottom line is that this recipe will work with any kind of potato, even Russet potatoes (the texture will be great, but the color of the dumplings will not be a traditional yellow). The traditional yellow color can even be enhanced by adding up to 1 TSP of a not-so-Czech ingredient, turmeric. ** In the Czech Republic, we use “hrubá mouka”, which can be translated as “coarse flour”. Unfortunately, this flour is not available in the US. My recipe works well with all-purpose flour. Some recipes in the US ask to substitute about ⅓ of the total amount of flour with Wondra flour. In my opinion, that is totally unnecessary since it is not a substitute for coarse flour. *** Cut the butter into small pieces before melting. Then, microwave in a measuring pitcher or a small mixing bowl for a short time with a few seconds’ break in between – to prevent little “explosions”. Optionally, melt the butter over low heat with occasional stirring.

Nutrition per 1 Serving:(recipe split into 4 servings)

Estimated
Calories 468 Protein 12.4 g Fat 14.6 g Saturated fat 6.6 g Carbohydrate 71.7 g Sugars 1.6 g Fiber 5.0 g Sodium 211 mg Cholesterol 115 mg
Vegetarian
Estimated. Worked out from the ingredients above using the United States Department of Agriculture’s FoodData Central reference data. An estimate, not a measurement — brands, sizes and how much of a marinade actually ends up on the plate all move it.
Directions:

1.Potato Preparation:

Let’s start the preparation of the Potato Side Dumplings.

Note: Cook the potatoes with the peel on. When they are fully cooked and cooled, you are going to peel them and then process them further.

1.1.

Thoroughly rinse 1 ½ LB of potatoes under cold water to remove surface dirt.

1.2.

Place into a pot, add enough water to make sure that all potatoes are fully immersed, and then place the pot on a high-heat burner.

1.3.

Bring to a boil, then reduce the heat to medium and cook until fully cooked (the time depends on the kind and size of the potatoes – it can take anywhere between 20 – 60 minutes). To make sure that the potatoes are fully cooked, place a fork in the center – if the fork goes in smoothly and without any resistance (just as it would when you are eating side potatoes), your potatoes are cooked. If you are still not sure, cook the potatoes a little bit longer – slightly overcooked potatoes will do the job well too.

1.4.

When cooked, drain and let them fully cool on the countertop for later steps (before peeling). You can speed up the process by immersing them in cold water.

2.Fill and Preheat the Pot:

2.1.

Fill a pot with water to about ½ capacity (you can use the same pot you used for cooking the potatoes), cover it with a lid, and bring to a boil on high heat.

3.Dumpling Dough:

3.1.

Peel the potatoes by hand, or optionally use a paring knife for parts that are hard to peel. Dispose of the peel.

3.2.

Use a box grater (the side with larger holes) to shred the potatoes into a large mixing bowl. Pieces that cannot be shredded – too small or falling apart – simply smash with your hand and add into the bowl (it is best to eliminate large potato pieces, as they will make it harder for your dough to hold together).

3.3.
Then add:
1 ¾ cups of all-purpose flour
3 TBSP of melted butter
¼ TSP of salt
2 large eggs

Using your hands, knead into a compact dough – just enough to nicely combine it. Do not knead longer than necessary to prevent mushy dumplings. The dough can be slightly sticky but should not be too sticky (it can slightly stick to your fingers, but you should be able to move the dough with your hands without a problem). If the dough sticks too much, incorporate more flour and knead by hand again (add the extra flour gradually, part by part).

3.4.
Place your dough on a lightly floured surface and form it into two medium loaves with a diameter of about 2 – 3”.

Important: If your pot is smaller, you may want to consider splitting the dumpling dough into more than 2 loaves.

4.Cooking:

Note: Based on the size of your pot, you may have to work in batches – make sure that the dumplings have enough space to grow since they will slightly expand.

4.1.

Make sure that the water in your pot is boiling.

4.2.

Carefully slip the dumpling loaves into the water.

4.3.

After about 1 – 2 minutes of cooking, gently move the dumplings to prevent them from sticking to the bottom.

4.4.
Then cook until done (about 20 – 25 minutes). Turn after 10 minutes of cooking.

Note: The dumplings can be slightly slimy on the top, and the internal temperature at the thickest point needs to be at least 165°F.

4.5.

Carefully remove the cooked dumplings from the water using two turners or a large skimmer.

4.6.

Brush each dumpling on top with 1 TBSP of vegetable oil to prevent drying.

4.7.

Let slightly cool before slicing (about 5 – 10 minutes).

5.Plating:

5.1.

Slice into about ¾” thick slices.

5.2.
Serve the Potato Side Dumplings warm with goulash, duck with sauerkraut, or any of your favorite meals.

Tip: The next day, you can reheat the dumplings in the microwave at the time of serving while covered with a microwavable lid, or you can use any steam pot. Either way, they will quickly become warm and steamy.

Potato Side Dumplings

Cook to safe temperatures and check for allergens. Nutrition values and results are estimates and may vary.

As an Amazon Associate I earn from qualifying purchases. Some of the ingredient and tool links above are affiliate links: if you buy through them the price is the same for you, and it helps keep these recipes free. #ad

Show moreShow less of the Disclaimer

Disclaimer

Last updated October 27, 2026

GENERAL INFORMATION

The content provided by Checked Solutions, LLC (doing business as Tom the Chef) ("we," "us," or "our") on https://www.tomthechef.com (the "Site") and through our related services — including recipes, articles, columns, live and recorded cooking classes, and other materials — is for general informational and educational purposes only and reflects the personal opinions and experience of the author. All information is provided in good faith; however, we make no representation or warranty of any kind, express or implied, regarding the accuracy, adequacy, validity, reliability, availability, or completeness of any information. Your use of the Site and your reliance on any information is solely at your own risk.

NO PROFESSIONAL ADVICE

Our content is not intended to provide, and does not constitute, professional dietary, medical, nutritional, or legal advice. Before making any health- or diet-related decision based on our content, consult a qualified medical or nutritional professional.

COOKING, FOOD SAFETY, AND YOUR RESPONSIBILITY

You are solely responsible for evaluating our recipes and instructions and using your own judgment before following them. To the fullest extent permitted by law, we are not responsible for any outcome or consequence resulting from your use of the Site or our content, including but not limited to:

  • Food Safety: any health risk related to food handling, food quality, cross-contamination, or failure to follow USDA recommendations (including minimum safe cooking temperatures).
  • Preparation Safety: the safe handling of cooking equipment, hot surfaces, sharp knives, or the suitability of tools for any task.
  • Allergies and Dietary Restrictions: any allergic reaction or health issue arising from ingredients in our recipes. You are responsible for ensuring that all ingredients and methods are safe and appropriate for your dietary restrictions, allergies, and health.
  • Recipe Outcomes: the final look, taste, yield, or success of a recipe, which may vary based on ingredients, equipment, oven temperatures, altitude, humidity, and skill.
  • Ingredients and Equipment: the sourcing, quality, and condition of ingredients, tools, or equipment.
  • Nutritional Information: the accuracy of any nutritional data, which is an estimate provided as a courtesy and should not be relied on as a guarantee.
  • Errors and Omissions: any errors, typos, or unclear directions in our content.

EXTERNAL LINKS

The Site may contain links to third-party websites or content, including in banners or other advertising. We do not investigate, monitor, or guarantee the accuracy or reliability of third-party sites. We are not responsible for them or for any transaction between you and a third party. Accessing third-party sites is at your own risk.

TESTIMONIALS, REVIEWS, AND COMMENTS

The Site may contain testimonials, reviews, and comments from users. These reflect the personal experiences and opinions of individual users and may not be representative of all users; your individual results may vary. Testimonials and reviews may be shortened for brevity or corrected for grammar. The views expressed belong solely to the individual. They are not intended as claims that our products or services diagnose, treat, cure, or prevent any disease or medical condition.

CONTENT OWNERSHIP

All content published by Tom the Chef is the intellectual property of Checked Solutions, LLC and its author, unless otherwise noted, and may not be used except as permitted in our Terms of Use.

AFFILIATE DISCLOSURE

As an Amazon Associate, we earn from qualifying purchases. Some ingredient and tool links on the Site are affiliate links. If you buy through them, the price is the same for you, and it helps support our content. We only recommend products we genuinely use and trust.

LIMITATION OF LIABILITY

Under no circumstances shall Checked Solutions, LLC or Tom the Chef have any liability to you for any loss or damage of any kind incurred as a result of the use of the Site or reliance on any information provided. This Disclaimer forms part of, and is subject to, our Terms of Use.